Chapter 10b – Aisne

Tuesday, 28th May At 1am, the German 10th Divn crossed the Vesle near Bazoches sur Vesle and pushed on to the woods of Dole. The 5th Guards Divn crossed the Vesle to the…

You must be logged in to view the content of this Chapter.

Chapter 5b – 2nd Battle of the Scarpe

Preparations were originally focused on launching another offensive on the 21st of April on a front stretching nine miles from Croisilles to Gavrelle, but high winds and poor visibility prevented the artillery and…

You must be logged in to view the content of this Chapter.

The Somme Sector

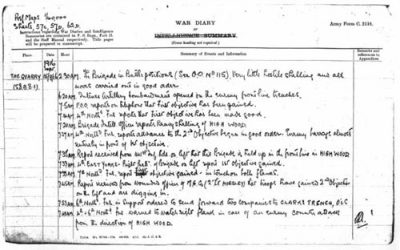
1st , 2nd & 3rd February 1917

Early in Feb rumours circulated that in a little while the Divn was to take over a portion of the French Line. Operation Orders were issued on the 7th stating that on the nights of the 13th/14th and 14th/15th the 50th Divn was to relieve the 35th and 36th French Divns in front of Belloy en Santerre1 and Berny en Santerre2 . This was part of a gradual extension of the British Front southwards as far as a point opposite the town of Roye3 . (50th Divn)

DERNANCOURT

Bn continued to train as on previous days. A party was detailed to proceed to Rue Des Illieux, Albert to fix up bathing apparatus for the whole Bde. In spite of pipes being frozen the majority of the men were bathed.

4th & 5th Feb

Training continued. Coys were practised in musketry on range allotted to us.

6th Febuary 1917

GOC 149th Infantry Bde inspected the Bn in full marching order.

7th February 1917

Lt T.A.L Thompson returned from leave on the 4th Feb 1917 and resumed duties of acting Adjt. Capt C Stephenson also returned from leave. 2nd Lt W.C Clemitson and seventeen men rejoined from base.

8th February 1917

At 9am the Bn marched off for Mericourt Sur Somme. Progress was very slow on account of having to halt whilst the Divn Train Transport, 2nd Field Ambulance and 446th Field Coy RE caught up with the rest of the column. Route lay via Buire Crossroads4, Ville Morlancourt5, Chipilly6, Cerissy7, Morcourt8and Mericourt Sur Somme9. Bn was billeted in houses and farms around Mericourt. The remainder of the Bde were billeted in large huts in vicinity of village. The intense cold prevailed. An enemy aeroplane flew over about 10.30pm and dropped bombs.

9th February 1917

Coys exercised in Coy drill.

10th February 1917

The Bn marched seven miles via Chuignolles and Chuignes to Bois Touffu. Dugout accommodation was found for the whole Bn.

BELLOY

11th February 1917

2nd Lt T Bonner was the recipient of the Croix de Guerre.

7pm Relieved 123rd Regt (French)

The ground was frozen hard on the 12th of Feb. The trenches occupied by the 4th Bn were in good condition although there were no revettments. At 6pm, ‘D’ Coy moved up in close support to the 7th Bn.
Work. Latrines and sanitary arrangements improved, and trenches cleaned.

Enemy artillery quiet during day and night, village occasionally shelled with 5.9’s.

No casualties

13th February 1917

Trenches and dugouts cleaned, and draining commenced in Boyau Bouchet. Enemy artillery shelled village area N 21 A occasionally with 5.9’s

7pm ‘D’ Coy returned to this sector.

14th February 1917

The trenches were cleaned, but, because the ground was frozen revetting could not start, but material was carried up to Argonne Trench and Bouchot Trench in preparation for when the thaw commenced.

11am to 1pm Area N21 A behind village heavily shelled with 5.9s and occasionally during day and night. 'C' Coy cookhouse blown in.

6pm ‘C’ Coy moved up in support of the 5th Bn in Trench De Hures.

15th February 1917

At 8am work and preparations for revetting Communication Trench No8 commenced l' Argonne Trench10 and Bouchot Trench11. Work continued throughout day, and carried by two parties of fifty from 6th Bn at night. One hundred yards in each trench, sides sloped and 2ft berm about sixty yards each.
Shelling of area N21 A desultory during daytime increasing towards midnight. Ten gas shells were sent over and fell near the junction of Trench De Parc12 and Bouchot. At 4pm a French bomb stores (near dump) at N21 C 80 exploded causing casualties, and a fire amongst RE material, which took until 4am the following morning to extinguish. One man killed and six wounded.

16th February 1917

On the 16th work continued on Argonne and Bouchot trenches and carried on at night-time by two parties from the 6th Bn. More material carried up ready for use ‘C’ Coy commenced work on Boyau II Bis sloping sides, materials carried up from Belloy for their use. Gas shells and 5.9s fell in Belloy during day and night. Much aerial activity and good observation. Casualties – One man wounded.

At 8am work continued on Argonne and Bouchot trenches, about 300 to 350 yards in each trench done with about 150 yards 2ft berm dug. The work was continued by two parties from the 6th Bn at night.
Boyau II Bis. 'C' Coy worked on this, sides sloped, duckboards repaired and laid.

The following RE material carried up from Belloy to Argonne and Bouchot. 800 long pickets, 15 coils wire, 50 sheets expanded metal and 100 trench boards. Our trenches now show signs of falling in owing to thaw. Gas and 5.9s shells fell occasionally in village day and night.

7pm to 12pm Enemy machine guns fired bursts of fire evidently intended for dump, bullets fell near PC Gaudy from direction Barleux.

18th February 1917

Argonne Trench 50 yards revetted 200 yards cleared of mud. Channels cut under duckboards.

Bouchot Trench 60 feet revetted

Trench de Hures 70 yards one side revetted

Marchal Trench 50 wooden stakes driven in

Boyau 2 Bis 200 yards relaid, 50 yards new duckboards laid

Trench du Parc Channels out under duckboards draining

Materials carried up to various trenches for work. Two rolls of rabbit wire, 100 x 6’ posts, 68 pickets, 34 duckboards, 170 pickets, 50 duckboards, 27 trenchboards.

11.30am Activity occasionally shelling in area. Heavy shelling between 11.30am and noon near junction Souville and Bouchot Trench with 5.9s and 4.2s HE and shrapnel.

Two men wounded.

19th February 1917

N34A to T.4A

At 8pm the Bn relieved the 5th Bn. Three Coys moved into the front line and one in support.

8am Work continued on Argonne, Bouchot and Marchal trenches. Thirty yards of revetting were carried out in Trench des Hures, Boyau 2 Bis. Activity occasional shelling Bouchot trench near junction Souville.

20th February 1917

Majority of the communication trenches in almost impassable condition, over knee deep in places. Left sector better. Carrying sent to dump for pump and duckboards. Commenced pumping Trench Martin.

Enemy heavily shelled vicinity of junction B Damloup and Trench Marchal with 5.9s between 9.30 & 10.30am also N33 D central occasionally. Two patrols sent out from the left and centre Coys reported that the ground was very soft and greasy, enemy sentries were thirty yards apart and that our wire in good condition.

Work on the trenches continued on the 21st, left Coy sector much improved, reconnoitred overland route to PC Hedevaux, wire and tape laid. The work of the centre and right Coys was delayed owing to having to clear trenches. Twenty-six trench boards were laid in Specel trench, four hand pumps were carried from Hedevaux to B Damloup. Our 18-pounder guns fired on enemy wire from 2pm until dusk. Two patrols from the centre and right Coys reconnoitred the enemy wire. A sap was discovered towards our lines finishing at T4A97. German wire extended from T4A91 to T4A83 and then to T4A85, and practically untouched Sap showed signs of heavy shelling two feet of water.
Enemy artillery shelled Annamites trench with 5.9s all day at retaliation, also Marchal trench junction with Danloup.

At 7.35pm and 8.30pm there was a short barrage on above trenches. Fish tails 40 fired in ravine 9pm and occasionally machine gun fire. Fish tails 40 fired Annamites trench.

22nd February 1917

The trenches were much improved with the continuing cleaning and pumping out. The communication trenches were still bad; laid six hundred yards of duckboard from N27C95 to N33B05 on the overland route. Twenty yards of Marchal trench were cleared and trench boards laid. Bridge erected over Trench Des Hures13 for overland route, twenty yards of Specel trench14 cleared and trench boards laid. From 1pm our Howitzers and 18-pounders were firing on the enemys’ wire.

Two patrols went out from right and centre Coys at midnight. ‘D’ Coy reported that while going along Sap T4A87, they had discovered a machine gun position at T4A83. Rifle grenades T4B28. Two rows French wire in front of our Specel trench and Couldur trench. One patrol from ‘B’ Coy left N34D11 enemy wire intact. Patrol worked fifty yards north wire very thick. Enemy listening post noted at N34D60, enemy post discovered at N34D93.

Enemy artillery was very quiet. Shelled and trench mortared Annamites trench occasionally at night. Machine gun fires on road N33D central. Enemy has two barrage lines 100 yards west of Annamites trench15, Marchal trench16 and Danloup17 trench.

On the 23rd work continued on clearing and pumping out the trenches, while two hundred more duckboards were laid on an overland track. The communication trenches were still waterlogged. Our Howitzers and 18-pounders on wire all day on enemy wire at points T4B04 N34D81/2 61/2 T4B16. Between midnight and 3am, five patrols were sent out and gaps ten yards wide were found in the wire at T4B04 and T4B16. The existence of sap T4A87 and a machine gun post at T4A83 were confirmed. Listening post suspected N34D60 and post at N34D73

Enemy artillery was quiet during the day but at 7.55pm enemy opened barrage on our front line, intense machine gun and trench mortar fire. Night very dark and communication with centre Coy was cut, they called for artillery retaliation in case of attack by enemy, by sending up an SOS which was repeated from headquarters. Our artillery opened barrage 30 seconds after SOS sent up and enemy fire soon died out about 8.20pm. Slight trench mortar activity during night also machine gun fire. One man killed and two wounded. (1 accidentally).

24th February 1917

Cleaning and draining work continued on all trenches, dugouts and posts in the sector. 95 duckboards laid on new track. Bridge built over trench N33D1.3. Our artillery continued to cut enemy wire at N34D8.6 with good results. Three patrols out report wire at T4B04 gap is ten yards wide, but wire 1’ high. Lamp signalling from Cyprus Road reported at 6.30pm.
Enemy attitude very active keen sniping many trench mortars and rifle grenades on Annamites trench, report little shelling except light barrage on Annamites trench at 8pm to 8.15pm
About thirty 5.9s about area N33, B33. One man wounded.

25th to 26th February 1917

On the 25th Divn HQ received the startling information that the enemy had begun to retire; he had evacuated Pys, north west of Le Sars, that morning. At night a further message stated that the British had occupied Pys, Irles and Serre. The German Retreat to the Hindenburg Line had begun. The 50th Divn, however, was not desperate to follow up the enemy as he fell back to his well prepared defences in the Hindenburg Line, for it was after the Divn had been relieved early in March, that he evacuated his defences south of the Somme

6am to 6am Work on the trenches, posts and dugouts continued. Specel Crabe, Calmon and Marchal trenches where left Coy are now in good condition. Communication Trenches still bad in places. Patrolling all night done by Coys, enemy front line, held by sentry groups thirty yards apart, very nervous, occasional bursts of machine gun fire.

6.30pm to 7.30 enemy trench mortared Annamites trench retaliation by artillery silenced him again repeated at 5.30am, 26th Feb.

Enemy artillery very quiet, occasional field guns on Annamites and only four 5.9s. Three German aeroplanes seen over our lines, two returning towards Horny. Duckboard track, length done now from N27C54 to N33D64.

27th February 1917

28th February 1917

On the 1st of March Divn HQ reported that on the nights of the 6th, 7th, 8th of March, the 59th Divn would relieve the 50th Divn.

FOUCAUCOURT

Working party of eight groups consisting of one NCO and eight men each was provided by the Bn to erect wire entanglements for the support line. The 149th Bde was tasked with erecting a two-mile length. 2nd Lt Emery MF is in charge of this party. Coys reorganised and refitted in the morning and were inspected by the CO in the afternoon.

2nd March 1917

The same strength of working party was sent out for wiring. The remainder of the Bn commenced training, and had baths at Bos St Martin.

3rd March 1917

All ranks available in the Bn were equipped out with the small box respirator and passed through a gas chamber to test their respirators. The rest of the day was devoted to completing the equipment and clothing of the Bn. The wiring party consisting of the same number of NCOs and men was sent out again.

4th March 1917

The usual working party found – Bn. Church parade 10am. Brigadier General Ovens inspected the Bn in billets at 3pm. Operation orders issued 7pm for move on following day.

On the 5th March, the relief of the 50th Divn by the 59th Divn began and continued until the 9th. The 149th Bde at this time was based in the Warfusee area. At 9am on that day the Bn paraded in full marching order and marched the seven miles to Bayonvillers via the main Amiens road. Hut encampment was taken over and occupied at Bayonvillers. In the aft Coys inspections took place.

6th March 1917

BAYONVILLERS

Bn parade Arm drill and hair
Route marches. Afternoon - Coy inspections.

7th March 1917

Routine same as previous day – Afternoon devoted to attention of feet of ‘A’ & ‘B’. Coys Inspection and hot bathing treatment.

8th March 1917

The days routine was the same as on the 6th and 7th - Feet inspection and treatment for remainder of Bn operation orders for proceeding day issued.

On the 9th of March the Bn paraded at 8.45am in full marching order and marched the two miles to Warfusee Abancourt and took over billets of 7th SF, No 2 area being occupied. The camp was composed of huts was very incomplete. Material (RE) was indented for and work was commenced immediately on latrines and cookhouse sheds.

10th March 1917

11.30am

Training and early morning parades at Warfusee commenced. Bn parade and inspections were carried out after camp and equipment etc had been thoroughly cleaned. Close order drill practised. Afternoon - Coy inspection took place.

Brigadier General Rees DSO took command of the 149th Bde on this date.

11th March 1917

10.30am Church parade service. Coy inspections after parade service in Bde canteen. Bde recreational training scheme was put in practise from this date the inter-Coy football matches commencing.

12th March 1917

9.30am Bn parade. Organisation of Coys and platoons into sections of specialists commenced from this date. The whole morning was devoted to specialist training. - Coy inspections and recreational training took place in the afternoon. Gallows for bayonet fighting practise and competitions was commenced.

13th March 1917

The days routine was the same as on the 12th. Officers lecture at Bde canteen 6pm.

14th March 1917

Routine and training as on day previous.

15th March 1917

A large working party of 250 men was assembled at 9am for work in the village from 9am under the orders of the town major. Only Lewis gun instructions was able to be continued on this day.

Specialist training continued after Coy parades on the 16th. Recreational training took the form of platoon cross country running races and football.

On the 17th March the Divn received information that the enemy had begun to withdraw from his position opposite the III Corps front.

Specialist training continued during the morning as on previous days. Afternoon Coy inspections and football match – 1st round of the inter-battalion rounds took place, the 4th Bn playing the Army Service Corps.

18th March 1917

Coy inspections during morning.

2.15pm Church parade service in Bde canteen.

19th March 1917

9.30am Bn parade. Specialist Training continued except for one Coy, which did a practical scheme of platoon attack etc. Lecture by Brigadier General to Officers and NCOs of Bde at 5.30pm in Bde amusement hut.

Training continued on the 20th, two Coys doing general training and the two remaining Coys being out, one on a route march with practise of Artillery formation upon deployment; the other doing a practical open warfare scheme.

21st March 1917

Routine as on previous day, with two Coys on a short march and practising deployment and march discipline etc.

6pm Lecture by OC to officers and NCOs (senior) on practise of open order work and deployment.

Training and routine as on previous day with general training of the two Coys that were marching the previous day, the other two Coys going for a short march and practising deployment and march discipline etc.

6pm Lecture to officers and senior NCOs by Bde bombing officer on rifle grenade work in open warfare etc.

22nd March 1917

9.30am Bn parade and inspection by the GOC 50th Divn General Wilkinson. Field day followed, the Bn going out on a route march. Deploying and advancing from artillery formation.

2.30pm Coy inspections

6pm Lecture for officers and NCOs by Major Robb.

23rd March 1917

8.30 Bn parade – field day – an open order attack practised from the main Warfusee-Villers Carbonnel road to the south east side of Bore D’achiel, a position being taken up and consolidated on high ground overlooking Hamel.

Coy inspections were held at 2pm on the 24th. At 5pm Capt Dixon delivered a lecture to the officers and NCOs. ‘D’ Coy proceeded on a Coy training scheme, ‘B’ and ‘C’ Coys carried out general training. ‘A’ Coy and during the morning another Coys attended the baths at Warfusee.

On the 25th March orders from Fourth Army HQ instructed the Divn to concentrate in the Talmas- Villers Bocage- Molliens area by March 31st.

Coy inspections during the morning – Roman Catholic and Non-Conformist Church parade

Church of England parade service in Recreation Hut (Bde) at 2.15pm. Afternoon Bde cross country runs as teams under arrangement of Lt Stiles from the T.M.B.

6.15pm Lecture by CO to officers.

26th March 1917

The Divn Field day was cancelled due to the bad weather. Morning was spent in giving lectures in the huts and attending to interior economy. Daily inspections and clothing parade in the afternoon.

Two NCOs and 28 men sent as a working party to RTO Warfusee for unloading supplies.

27th March 1917

Field firing exercise carried out by the Bn in the morning between Hamel and Warfusee, unfortunately ‘Sammy’ the regimental pet was killed during the firing.

A working party of two NCOs and 28 men was provided by the Bn for RTO Warfusee for unloading supplies.

At 6pm Major W Robb MC lectured to all officers, Warrant Officers and Sgts on consolidation.

At 9.45am on the 28th the 149th Bde was inspected by the III Corps Cdr - Lt Gen Sir W.P Pulteney KCB, KCMG, DSO. The Bn marched past and then proceeded on a route march via Cerisy with practise of deployment.

At 7.30pm the Bn practised a night attack on the ground between Warfusse and Hamel

29th March 1917

9.30am The CO inspected all Coys in fighting order during the morning.

The Somme 1917 - Military Units

50th (Northumbrian) Division - Consisted of the 149th (Northumberland) Bde, 150th (York & Durham) Bde and 151st (Durham Light Infantry (DLI)) Bde.

The 149th Bde was comprised of the 1/4th, 1/5th, 1/6th and 1/7th Bn - Northumberland Fusiliers.

The 150th Bde was comprised 1/4th Bn - East Yorkshires, 1/4th Bn - Green Howards, 1/5th - Bn Green Howards and 1/5th Bn - Durham Light Infantry.

The 151st Bde was comprised the 1/6th, 1/8th, 1/9th Bn - DLI and 1/5th (Cumberland) Bn - Border Regt.

1st Northumbria Field Coy RE

179th Tunnelling Coy RE

446th Field Coy RE

59th Division - Consisted of the 176th, 177th and 178th Bde.

The 176th (2nd Staffordshire) Bde was comprised of the 2/5th and 2/6th Bn - South Staffordshire Regt. 2/5th and 2/6th Bn - North Staffordshire Regt

The 177th (2nd Lincolnshire and Leicestershire) Bde was of comprised 2/4th and 2/5th Bn - Lincolnshire Regt. 2/4th and 2/5th Bn - Leicestershire Regt.

The 178th (2nd Notts and Derby) Bde was comprised of the 2/5th, 2/6th, 2/7th and 2/8th Bn - Sherwood Foresters (Nottinghamshire & Derbyshire Regt).

Bibliography

[zotpress items="4R6FADJ9" style="harvard1"]

Chapter 10a – Aisne

Redeployment to the Aisne Towards the end of April the 50th Divn was busy training and reorganising in the Roquetoire area when, rumours began to circulate of a move to another part of…

You must be logged in to view the content of this Chapter.

Second Battle of the Scarpe

Summary of events

With the exception of the 4th Bn (ordered to move to the old German line north of Beaurains) and two sections of the 149th MGC who were to support the attack of the 150th Bde, the 149th Bde was to remain in billets at Ronville 2 and Guemappe 3 was taken. The 4th Bn reached Buck Trench 4, and the Divn frontline was advanced to a point not far from the outskirts of Cherisy 5. HQ was established at Telegraph Hill 6

www.fairmile.fsbusiness.co.uk/odellarras.htm.

23rd April 1917 (St Georges Day)

At 4.15am the front line Bns were reported in position. The 150th Bde attack was to be carried out by the 4th Bn East Yorkshires on the right and the 4th Bn Green Howards on the left. Five minutes before Zero hour two tanks nosed their way to the front and moved slowly in a north-westerly direction.

At 8am the Bn moved forward again to the O.G. 1st line (map ref: N.5.b) and remained there during the day at half an hour notice. The Bn moved forward at five minutes notice at 7.45pm to the Brown Line 7 and for tactical purposes came under the orders of the GOC 151st Bde.

During the early morning of the 24th the 151st Bde relieved the 150th Bde, who moved back into reserve in the Harp area 8; the 4th Bn were attached to the 151st Bde, the remainder of the 149th being in support.

At about 11.30am, the enemy was reported retiring in front of the 30th Divn, and the GOC of the 30th Divn stated that he was going to push on to the Blue line 9.

Wancourt

The Bn moved forward from the Brown Line under the orders of the 151st Bde. ‘B’ Coy were sent forward to the front line and came under the orders of the 5th Bn DLI. They dug and occupied a new trench connected to the right flank of the 9th Bn DLI. Their covering party captured four Germans. No contact was made on the right flank until 3pm at which time communications were established with the 5th Bn Border Regt who were to the rear and slightly right of them. The 5th Bn Borders agreed to come forward at night and dig and occupy a trench that would be connected with ‘B’ Coy on the left.

‘A’, ’C’ and ‘D’ Coys and Bn HQ arrived at the old British front line north of Wancourt Tower (dispositions as per sketch) 2.30am. Rations were brought up to the 5th Bn Border HQ in the Long Lane 10 and brought up to ‘A’, ‘D’ and HQ by ‘C’ Coy. There was insufficient time to deliver rations to ‘B’ Coy before daylight so the men had to consume their second lot of iron rations. ‘B’ Coy were subjected to continuous, heavy shellfire and persistent sniping. 2nd Lt R Johnson and five men were killed and 16 men were wounded.

('B' Coy or the Bn) Lewis Guns identified good targets at ranges varying round 1000 yards and inflicted several casualties on the enemy. One Lewis gun was destroyed by shellfire. The areas occupied by the remaining Coys were also subjected to considerable artillery fire, which was especially violent between 2.30am and 7am and again between 1.30pm and 2pm. No direct hits were obtained on the trench and no casualties were sustained in this line during daylight.

2pm A part of ten stretcher-bearers and ten men were sent out to collect wounded still lying on the battlefield.

The GOC 151st Bde was instructed to advance at 4pm under an artillery barrage. But, meanwhile, the 30th Divn had already reached the Blue line, and was digging in on it, and the 151st Bde was, therefore, ordered to conform immediately to the movement of the 30th Divn. The 5th Borders Regt swung up their right flank and obtained touch at about 4pm. But the 9th DLI, in the centre, with a Coy of the 4th Bn attacked, and had a sharp tussle with the enemy before occupying the Blue Line 11. (50th Divn)

3pm ‘B’ Coy under 9th Bn DLI orders (2.25pm) went forward one platoon to reconnoitre and capture an enemy trench 600 yards long astride the railway. The platoon captured the trench sustaining three casualties in the process.

Bn HQ received Operation Orders at 3.30pm stating that the 15th Divn were advancing on the left and 9th Bn DLI would support their advance with rifle, Lewis Gun and MG fire. Also that they would push forward patrols to reconnoitre and capture the German trench six hundred yards long astride the railway. OC 9th Bn DLI detailed ‘B’ Coy for this work and captured and held the trench as described above.

At 5.22pm 4th Bn HQ received a wire from OC 9th Bn DLI stating that one of the 'B' Coy platoons had just captured an enemy trench (from map ref: O.20.7.6. to O.20.C.1.9) and was holding it. Only three casualties were incurred. Fine piece of work. Lt Col B.D. Gibson and 2nd Lt Burton went forward to reconnoitre the new positions occupied by ‘B’ Coy and ‘A’ and ‘D’ Coys.

Another platoon was sent forward under heavy artillery and machine gun fire to help hold it. Under cover of darkness one more platoon of ‘B’ Coy was sent forward to the trench and three strong points were constructed, two north and one south of the railway. [zotpressInText item="{4R6FADJ9,}"]

10pm ‘A’ and ‘D’ Coys dug a new support trench between the railway and the Cojeul River and occupied it. One machine gun was attached to each Coy. At 10.30pm Bn HQ moved to a dugout at the old German gun pits at the north end of old German support line between Cojeul River and the railway. ‘C’

2nd Scarpe - Military Units

15th (Scottish) Division - Comprised of the 44th, 45th and 46th Infantry Brigades

The 44th Bde - Comprised of the 9th Bn - Black Watch, 8th Bn - Seaforth Highlanders, 8th & 10th Bns - Gordon Highlanders, 7th Bn - Camerons.

The 45th Bde -Comprised of the 13th Bn - Royal Scots, 6th & 7th Bn - Royal Scots Fusiliers, 6th Bn - Camerons, 11th Bn - Argyll and Sutherland Highlanders.

The 46th Bde - Comprised of the 10th Bn - Scottish Rifles, 7th & 8th Bn Kings Own Scottish Borderers, 10th & 11th Bn - Highland Light Infantry, 12th Bn - Highland Light Infantry.

30th Division - Consisted of the 89th, 90th and 91st Bde.

The 89th Bde comprised of the 17th, 18th, 19th and 20th Bns - The Kings Liverpool Regiment

The 90th Bde comprised of the 16th, 17th, 18th and 19th Bns - The Manchester Regiment.

The 91st Bde comprised of the 20th, 21st, 22nd and 24th Bns - The Manchester Regiment.

50th (Northumbrian) Division Consisted of the 149th (Northumberland) Bde, 150th (York & Durham) Bde and 151st (Durham Light Infantry (DLI)) Bde.

The 149th Bde comprised of the 1/4th, 1/5th, 1/6th and 1/7th Bn Northumberland Fusiliers

The 150th Bde comprised 1/4th Bn East Yorkshires, 1/4th Bn Green Howards, 1/5th Bn Green Howards and 1/5th Bn Durham Light Infantry

The 151st Bde comprised the 1/6th, 1/8th, 1/9th Bn - DLI and 1/5th (Cumberland) Bn - Border Regt.

149th MGC -

Bibliography

[zotpress items="HUXKQ9EA" style="harvard1"]

[zotpress items="4R6FADJ9" style="harvard1"]

Categories

Gird Trench, Hook Sap

12th November 1916

‘B’ and ‘C’ Coys moved into Snag Trench 1 and Snag Support 2, ‘A’ Coy to Abbaye Trench 3 and ‘D’ Coy the Flers Line 4. The Bn was warned to be ready for an assault on Hook Sap 5. Lt Col. Gibson visited the front line system of trenches and reported that the communication trench was impassable in many places and the condition of Snag front line and support was extremely bad.

Snag Trench was 6ft wide and it was almost impossible to move along. In several instances men had become completely stuck in the mud and took over an hour to be dug out. Rifle fire was fairly heavy during early morning of the 12th. The German 5th Bn Grenadier Guards were now in the trenches opposite the Bn and were much more active than the Saxon Regt who were opposite on the previous tour in the trenches.

At 7.45am the enemy front line very heavily shelled.

At 10am the Bn received word that the attack on Hook Sap was postponed until the 14th and would be carried out by the 6th and 7th Bns. Work continued on Snag new support trench. Front line system was heavily shelled during the morning with the Bn suffering about twenty casualties with several men temporarily buried as well.

13th November 1916

Orders were received stating that the 1st Divn would relieve the 50th Divn between the 17th and 19th of November.

At 6.30pm, Bde HQ issued an operation order, detailing the 5th Bn to attack on the right flank and the 7th Bn on the left. The 4th Bn were to be held in support with two Coys in Hexham Road 6 and two in the Flers Line (with 5th Bn Green Howards attached). The 6th Bn were to hold the front line from the left of the 7th Bn to the Bde Boundary on the left and support the attack with Lewis Gun and rifle fire.

During the night of the 12th/13th Snag new support trench was dug and completed and Pioneer Alley 7 was cleared as far as possible. To make it passable approximately two hundred duck-boards were laid cross wise in Snag Trench.

At 5.45am a Chinese barrage 8 was laid down on Hook Sap and the Gird Line 9. With the artillery suddenly opening and the barrage steadily creeping forward, it gave the Germans the impression that an infantry assault was in progress.

'This of course, alarms the Bosche, who thinks we are coming over, and brings down all his artillery barrages too. These bombardments took place at 6am for several days’ [zotpressInText item="{ZZCPTDHK,76}"]

Enemy retaliation was very severe especially on Hexham Road 10, where an intense barrage was put up for an hour. Bn once again had several casualties from shell-fire.

The relief of the Bn by the 5th Bn commenced at 8pm, ‘C’ and ‘D’ Coys moved back to the Flers Line, but ‘A’ and ‘B’ Coys remained at Hexham Road. The relief was completed at 11.45pm.

the 5th and 7th Bns moved into position during the night ready to attack Hook Sap and the Gird Line at 6.45am.

‘The position was now as follows. The 1st Divn had pushed the enemy back to a line running along the top of a ridge running from the Butte of Warlencourt practically due east. This ridge prevented our seeing the enemy’s approaches and support position in Le Barque. On the other hand from Loupart Wood the whole of our approaches and support trenches were in full view of the enemy, as far back as High Wood. Across these two miles no one could move in daylight without being seen by the enemy, and there was practically no position to put our field guns forward of High Wood. The enemys’ front line consisted of two trenches - Gird Line and Gird Support - with a forward trench on top of the ridge, called on the left ‘ Butte Trench and on the right ‘Hook Sap’. Our front line Snag Trench and Maxwell Trench lay this side of the ridge and about two hundred yards away from the German forward trench’. [zotpressInText item="{Z5UXG9XQ}"]

‘The Butte of Warlencourt was a round chalk hill, rising about one hundred feet above ground level; and had been mined with deep dugouts and made into a formidable strong point. From the Butte, machine guns defended the approaches to Hook Sap, and the Hook Sap and the Gird line, machine guns defended the approaches to the Butte. The ground between and around the opposing trenches had been ploughed up with innumerable shells, some of huge calibre, and it was now a spongy morass, difficult to cross at a walk and impossible at a run. As events proved, unless both the Butte and the Gird Line could be taken at the same time, the one would render the other impossible to hold. This then was the problem that faced the 50th Divn, a problem that would have been difficult enough in the driest of weather, but rendered four times more so by the rain which fell in deluges on three days out of four during the whole of October and November’. [zotpressInText item="{Z5UXG9XQ}"]

‘A’ and ‘D’ Coy were in Hexham Road and ‘B’ and ‘C’ Coy in the Flers Line when the 5th and 7th Bns went ‘over the top’ to attack Hook Sap, alongside troops from the 2nd Australian Divn. On this occasion mist obscured the attacking troops from the troops in the Flers Line. The enemy defensive barrage was very prompt, opening up within two minutes of zero hour.

The 19th Australian Bn in conjunction with the 5th and 7th Bns took Gird Support. However, the trench was waterlogged, so they fell back to Gird Trench. The 7th Bn appeared to have taken Hook Sap, but they came under severe fire from Butte Trench and nothing more was heard from them. The day wore on and counterattacks were fought off. Two Coys of the 20th (New South Wales) Bn attempted a move against the Maze at 4.45pm but were stopped by machine gun fire. [zotpressInText item="{XGEW4MF2,156}"].

At 10am Capt R.W. Cranage was slightly wounded by piece of shrapnel in Flers Line.

On receipt of this news a sap was begun running out from Snag Trench to Hook Sap, the men digging hard. This sap was begun by 'D' Coy of the 4th Bn, who had been detailed for the work in operation orders. But at 11.30am they had to cease digging as the enemy machine gun fire was too heavy (50th Divn)

‘D’ Coy, under the orders of the 7th Bn, proceeded from Hexham Road to the head of Pioneer Alley to continue this Communication Trench towards Hook Sap. Machine Gun fire was so heavy that the party returned to Hexham Road.

At 2.35pm ‘A’ Coy was placed at the disposal of the 5th Bn. At 5pm 2nd Lt T. Bonner and fifty men reinforced the Gird Line on right (held by 5th and 7th Bns) with bombs and occupy left flank portion of line next to enemy. This party was engaged in heavy bomb fighting all next day.

3.30pm Trenches .

CO moves to Hexham Road to meet GOC 149th Bde

At 5pm ‘B’ and ‘C’ Coys move up to Hexham Road. ‘D’ Coy moves up to Snag trench front line.

At 6.30pm ‘B’ Coy moved to Snag trench to dig a Communication Trench from the head of Pioneer Alley to Hook Sap. ‘C’ Coy moved to Snag left of Pioneer Alley. Capt J.W. Robinson (OC ‘B’ Coy) was killed while leading a patrol reconnoitring Hook Sap.

At 11pm Lt Col B.D. Gibson and Maj N.I. Wright (5th Bn) went forward to reorganise the front line prior to an attack. For this task they had one Coy from the 4th and 7th Bns on the left and another Coy from the 4th Bn and the remains of 'A' Coy from the 7th Bn about thirty men.

The two coys in Starfish Trench went forward and occupied positions in Prue Trench vacated by the 7th Bn, who had gone further forward. Later in the day these Coys were recalled as the 7th Bn were returning there. The Bn expected to be relieved that night, but at 3pm orders were received that stating the the 4th and 7th Bn should relieve the Durhams in the front line. The 4th Bn relieved the 8th Bn DLI and 5th Bn Borders. The weather and the mud was appalling and a large number of bombs had to be carried forward, so the men were absolutely exhausted. The relief was not completed until about 9am on the morning of the 3rd.

15th November 1916

Trenches, Hexham Road & Snag Trench

At 12.30am the 4th and 5th Bns launched an attack but owing to intense enemy barrage and heavy rifle and Machine gun fire the attack failed. Capt J.W. Robinson and 2nd Lt F.J. Larken were killed, Lt Col B.D. Gibson and 2nd Lt T. Bonner were wounded and 2nd Lt A.V. Berrick was missing.

At midnight a detachment of the 4th and 5th Bns attacked on the other flank and similar results were achieved. (McCarthy. p.156).

At 2am the Bn was ordered to reorganise and defend Snag Trench. Lt Col Gibson and Wright returned to Bn HQ as nothing more could be done for the present.

Enemy shelling fairly heavy all day.

16th November 1916

The Bn, including the party in the Gird Line, was relieved by the 4th Bn East Yorks and moved back to the Flers Line. The Bn War Diary shows that the operations between the 14th and 16th of November resulted in the 4th Bn suffering 21 men killed, 62 wounded and 5 missing.

On the afternoon of the 17th the Bn was relieved by the 10th Bn Gloucesters (1st Divn) and move back to Bazentin Le Grand 11.

At 12 noon on the 18th the Bn proceeded by rail to Albert and was billeted in Felix Faure.

Casualties

Records show that at least 40 fusiliers from the 4th Bn were killed in action or died of wounds during the fighting for Gird Trench and Hook Sap. For information on 4th Bn burial and memorial sites for casualties sustained in this battle, select the link.

Gird Trench, Hook Sap - Military Units

1st Division - Comprised of the 1st, 2nd and 3rd Infantry Brigades.

The 1st Bde - Comprised of the 10th Bn - Gloucestershire Regt, 1st Bn - Black Watch, 8th Bn - Royal Berkshire Regt and 1st Bn - Queen’s Own Cameron Highlanders.

The 2nd Bde - Comprised of the 2nd Bn - Royal Sussex Regt, 1st Bn - Loyal North Lancashire Regt, 1st Bn - Northamptonshire Regt and 2nd Bn - King’s Royal Rifle Corps.

The 3rd Bde - Comprised of the 1st Bn - South Wales Borderers, 1st Bn - Gloucestershire Regt, 2nd Bn - Welsh Regt and 2nd Bn - Royal Munster Fusiliers.

Pioneer Battalion - 1/6th - Bn Welsh Regt.

50th (Northumbrian) Division - Comprised of the 149th (Northumberland) Bde, 150th (York & Durham) Bde and 151st (Durham Light Infantry (DLI)) Bde.

The 149th Bde was comprised of the 1/4th, 1/5th, 1/6th and 1/7th Bns - Northumberland Fusiliers.

The 150th Bde was comprised 1/4th Bn - East Yorkshires, 1/4th & 1/5th Bn - Green Howards and 1/5th Bn - Durham Light Infantry.

The 151st Bde was comprised the 1/6th, 1/7th, 1/8th and 1/9th Bns - Durham Light Infantry (DLI). 1/5th (Cumberland) Bn, Border Regt.

Bibliography

[zotpress items="WPX27IS4" style="harvard1"]

[zotpress items="Z5UXG9XQ" style="harvard1"]

[zotpress items="HUXKQ9EA" style="harvard1"]

[zotpress items="4R6FADJ9" style="harvard1"]

[zotpress items="53JCQRAK" style="harvard1"]

[zotpress items="XGEW4MF2" style="harvard1"]

.

.

Flers-Courcelette

11th Aug 1916

The 4th Battalion (Bn) left Vth Corps reserve at Meteren1 and entrained at Bailleul2, destined for the town of Doullens3 some 70 km further south. After a three hour march from Doullens they arrived in their billeting area around Fienvillers4. This was the first time that the Bn had left the Ypres area since landing in France sixteen months earlier.

The 12th to the 14th were largely devoted to route marches to raise fitness levels after the such a long period in the trenches. Reveille on the 15th was very early, the Bn setting out on an eight mile to Naours at 4.40am. They were billeted here for the day, then marched to Pierregotte5 for another overnight stop and then on to Henencourt Wood6. Trench attacks were practised in Henencourt Wood until the 28th, when bad weather curtailed training for three days. Training recommenced with night operations alongside the 7th Bn on the 31st, but then the weather deteriorated again and training had to be curtailed for four days. A varied program of training began on the 6th of September, geared principally towards the Bde Sports Day which was held on the 8th.

View of Martinpuich on the road from High Wood – 2008 (Author’s collection).

Saturday, 9th Sep 1916

At 3pm, the 4th Bn moved from Henencourt Wood, via Millencourt7 and Albert8, to Becourt Wood9, situated approximately two miles east of Albert. The 50th Division (Divn) were moving into the front line, between the village of Martinpuich10 and High Wood11, in preparation for an attack. The 149th Bde were assigned the right flank of the sector and the 150th Bde the left. That evening the 5th Bn moved into the front line and the 6th Bn into the support lines.

Sunday, 10th Sep 1916

Little occurred apart from the officers and NCOs reconnoitring the front and support lines.

Monday, 11th Sep 1916

By 7am, the 4th Bn were encamped in Becourt Wood, the 7th Bn in Quadrangle Trench12 and the 6th Bn were established in the support lines. The 5th Bn occupied the front line which consisted of Clark's Trench13 and the posts out in front, notably Eye Trench14. They also occupied part of 6th Avenue East15 and the new Intermediate Trench16, east of its junction with Jutland Alley17.

At 7.25am OC 149th Bde (Brigadier-General Clifford ) set out with his staff captain (Capt D Hill) to reconnoitre the assembly trenches and was shot dead by a sniper whilst he was inspecting Eye Trench. Lt Col Turner CMG (OC ?Bn) assumed temporary command of the Bde. Meanwhile the 4th Bn received a draft of fifty men who had been transferred from the Norfolk Regt.

During the day the 149th Bde front line was extended westwards to include Jutland Alley. The boundary between the 149th Bde and 150th Bde now ran from the junction of Clark's Trench with Jutland Alley to the cross roads (map ref: S.8.b6.9), road junction (map ref: S.8 C.9.7), O.G. Trench (map ref: S.14 A 2.6) and the north-west corner Mametz Wood18.

That night the Bde handed control of the extreme right flank of their sector to the 142nd Bde (47th Divn). The 50th Divn boundary with the 47th Divn now ran from Clark's Trench (map ref: S.3d.2.81/2) to the windmill (map ref: S.9.C.3.9), the road (map ref: S.8.d.9.1), crossroads (exclusive to 149th Bde) (map ref: S.14 b 1.5), point on road (map ref: S.13 b1.0), road inclusive to 149th Bde (map ref: X24 a 8.8) and thence to point in Quadrangle Trench (map ref: X 23 C 4 61/2).

Tuesday, 12th Sep 1916

The preliminary bombardment for the attack commenced, however Bn positions remained unchanged.

Wednesday, 13th Sep 1916

Between 5 and 6am the 4th Bn moved by platoons to the south-west corner of Mametz Wood.

“Mametz Wood presented a terrible appearance. Bitter fighting had take place for the possession of the wood and Contalmaison village west of it. Swept by an awful holocaust of shellfire, first by British guns and then by the German artillery on the wood passing into our hands, it had become a place of evil repute”. [zotpressInText item="{4R6FADJ9,140}"]

Over the next two days the 4th Bn was supplied with all the equipment necessary to bring it up to full fighting order. Battle formations and artillery arrangements were thoroughly planned by the officers and Brigadier-General Ovens CMG assumed command of the Bde.

Thursday, 14th Sep 1916

At 9.30pm the Bn moved from Mametz Wood via the ‘Quarry19 and then overland to its battle position on the right flank of the 149th Bde sector.

The Battle of Flers/Courcelette continued - go to 15 Sep 1916

4th Battalion War Diary

The author has coloured this map for clarity

Lines British trenches - dark blue, German trenches - red, pre-war road & tracks - yellow, contours - brown.

Shading 4th Bn line of attack - yellow, 7th Bn - purple, 150th Bde - brown

High Wood - green, Martinpuich - red

Page from 149th Bde War Diary

15 Sep 1916


Briage War Diary - 15 Sep 16

Friday, 15th Sep 1916

By 2.30am, the entire 50th Divn was assembled in its' battle positions. The 150th Bde were on the left flank of the 50th Divn sector with the 15th (Scottish) Divn to its immediate left, the 149th Bde were on the right flank with the 47th (London) Divn to their right, immediately south of High Wood. The 151st Bde was held in reserve.

The 7th Bn assembled on the left flank of the 149th Bde sector and sited its' headquarters (HQ) in Clark's Trench (map ref: S.3a 1,0). The 4th Bn moved into the two lines of assembly trenches on the right flank, connecting Bethel Sap20 and Jutland Avenue, to the north of Clark's Trench (principally Eye Trench) (map ref: S.3b 6.6 - S.3b O5.5.). Running from left to right the 4th Bn Coys were ordered D, B, A and C. Bn HQ was sited in Clark's Trench (map ref: S.3c.4.9). The 6th Bn manned the support line with its' HQ at 'New Quarry' (map ref: S8d 9.9.5). The 5th Bn was held in reserve with HQ at the 'Old Quarry' (map ref: S.8b.8.1). 149th Bde HQ was located in 'The Quarry' at (map ref: S.8b.8.1).

The 50th Divn were given three objectives for the attack planned to commence at 6.20am. The first was Hook Trench21, which ran westward from High Wood along the top of a ridge to a point south east of Martinpuich. On the reverse slope of the ridge at about 500 yards distance was the second objective; Martin Trench22, The Bow23 and a portion of the Starfish Line24. The third objective was Prue Trench25 and the left end of the Starfish Line. These three objectives were known as the Brown, Green and Blue Lines respectively. A communication trench known as Crescent Alley26 linked the enemy first and second lines with their third line and the village of Eaucourt L’Abbaye27. The 50th Divn would attack from a line approximately eleven hundred yards wide, widening to eighteen hundred yards at the final objective.

The 4th Bn were faced with an unenviable task. Earlier fighting had left a 'dog-leg' in the front line, therefore the 4th Bns' assembly (Eye) trench was three hundred yards further forward than those of the 47th Divn on the right flank. If the fusiliers did not delay their advance until the 47th Divn were alongside they would be totally exposed to enfilade fire from enemy machine guns sited in the strongpoint on the ridge top at the north west corner of High Wood (Bois De Foureaux). From this strongpoint it was possible for the enemy to rake the ground between the wood and Martinpuich to the west. The strongpoint had been repeatedly attacked in the weeks preceding, but with no success. However, if High Wood was outflanked by the 4th Bn, there was the possibility of capturing trenches eight hundred yards to the rear of the wood and cutting off the enemy units in it. The decision was taken for the 4th Bn to advance at zero hour.

Captain L.D. Plummer

The assault on the first objective, assisted by tanks for the first time in history, commenced on time. Two of the tanks supported the 150th Bde on the left flank and three supported the 47th Divn on the right. Around 7am, 4th Bn HQ recorded its first situation report from the attacking troops. It was sent by OC 'B' Coy (Capt L.D.Plummer) and stated that; Hook Trench had fallen with little opposition, contact had been established on the left flank with ‘D’ Coy (OC - Capt H.H. Bell) and the 7th Bn and that the 7th Bn were in contact with the 4th Bn East Yorks (150th Bde). Shortly after this message another was received stating that wounded men from ‘B’ Coy were returning to the start point.

Lt H.H. Bell
Lt H.H. Bell

4th Bn HQ telephoned Bde HQ at 7.14am to report that the first objective had been 'made good'. However, the 4th and 7th Bns had just begun to dig in at the first objective when they came under heavy machine gun and rifle fire from the direction of High Wood. The fusiliers took shelter until it was time to advance on the second objective at 7.20am.

The time arrived and the 149th and 150th Bdes climbed out of Hook Trench and advanced behind a creeping artillery barrage moving forward at fifty yards per minute. At the same time a Coy from the 6th Bn, (OC - Capt Tweedy), moved forward to occupy and consolidate Hook Trench.

At 7.27am Bde HQ received a report from the 4th Bn stating that the advance to the 2nd objective had begun in good order and that the enemy barrage was falling almost entirely in front of the 1st objective. This was followed at 7.35am by a report from the 141st Bde stating that they were 'held up' in the front line in High Wood.

The second objective was captured and fusiliers of the 4th Bn entered the Starfish Line, but enemy fire from both flanks inflicted very heavy casualties on them. With the 47th Divn held up in High Wood and unable to provide any support on the right flank, the 4th Bn were forced to fall back to Hook Trench. The severe difficulties experienced by the 47th Divn, in High Wood, meant that the right flank of the 4th Bn was now dangerously exposed and would had to be carefully guarded from attack. Hook Trench and Bethel Sap were strengthened and made secure.

At 7.45am 4th Bn HQ received a message from Bde HQ stating that the 47th Divn attack on High Wood had ground to a halt and that the 5th and 6th Bns were now advancing in order to reinforce the attack.

Col Gibson had no men to spare in Clark's Trench, so at 8.05am he wired for another Coy to be sent forward to Clark's Trench with the intention of forming a defensive flank in Bethel Sap, and sent 2nd Lt Wilson (Bn HQ) to assess the situation to the right of Hook Trench. His report stated that the north end of Bethel Sap and right end of Hook Trench was being swept by machine gun fire from High Wood.

At 8.20am 4th Bn HQ received a further message from Bde HQ, which stated that the London Irish were unable to advance in High Wood, so they were now trying to work round it. The 4th Bn was ordered to assist them by directing Stokes Mortar and Lewis Gun fire from Bethel Sap onto the north western edge of the wood (map ref: S3B 8.6), but not to fire into it.

At 8.25am two Coys from the 5th Bn were sent forward to Brecon Trench28 and Intermediate Trench and shortly afterwards a Coy from the 6th Bn (OC - Capt Demford) were placed at the disposal of Col Gibson by OC 7th Bn. Half of this Coy was sent to Bethel Sap and half to the left end of Hook Trench with orders to work along half right and form a defensive flank. At 8.50am 2nd Lt Wilson's findings were reported to Bde HQ by Col Gibson. However, by 9am further reports were sent stating that Stokes, Vickers and Lewis guns were protecting Bethel Sap and that Hook Trench was held for a few yards east of its junction with Bethel Sap. At 9.05am the 9th DLI were sent forward to assist the 149th Bde.

At 9.15am a wounded NCO from the 4th Bn reported that the 2nd objective had been reached on the right flank, however, they had been forced to retire due to the machine gun fire coming from the right flank.

At 9.25am the 4th Bn reported that the enemy had launched a bombing attack on Bethel Sap from the direction of High Wood, this was quickly followed by a request for bombers to be sent forward to assist with the defence. At 9.39am a Coy from the 6th Bn, who by now were in Clark's Trench, were placed at the disposal of OC 4th Bn and a Coy from the 5th Bn moved forward to take its place.

The 4th Bn received a message at 9.45am, stating that Divn HQ had directed that Hook Trench must be made good and strengthened as far right as the Divn boundary. Hook Trench and Bethel Sap were strengthened and the right flank was secured as far as it was possible, with Lewis Gun and Stokes Mortar fire employed to disperse the continued attacks by enemy bombing parties from High Wood.

At 10am the 5th Bn were ordered to move three Coys forward to Brecon Trench and to be prepared to support 4th Bn should an enemy counterattack from High Wood materialise. Parts of the third objective (Starfish Line) fell to the 150th Bde around this time, but the 4th Bn East Yorks were forced to fall back to Martin Trench because they were so exposed on the right flank. Elements of the 7th Bn had managed to reach 'The Bow' and the sunken road immediately south of it by 10.12am, but the 4th Bn had been cut to pieces by the fire from High Wood

While fighting continued on the right flank to the north-west of High Wood, where the 6th Bn were now providing a defensive flank.

10.10am 4th Bn reported having sent half Coy to Bethel Sap and half Coy to left flank of the 1st objective to bomb down Hook Trench. Enemy still bombing down the right flank of Hook Trench.

10.12am the 7th Bn reported that the Sunken road and Bow Trench, just short of the 2nd objective, had been reached.

“By 10.30am so little progress had been made that Pulteney curtailed the corps' effort for the day and ordered the 50th and 47th Divns to aim only for the second of their three objectives.” (Farrar-Hockley).

At 10.35am a Coy from the 5th Bn (OC - Lt Daglish), arrived in Clark's Trench to garrison it. At 10.40am 2nd Lt Wilson was sent forward once more to assess the situation around Hook Trench. Half of Lt Daglish’s Coy was sent forward to bomb round Hook Trench on the right and make contact with Bethel Sap.

At 11.30am heavy artillery bombarded the north west corner of High Wood at the request of the OC 141st Bde. As the 47th Divn gradually worked round High Wood the enemy began to retire and were again caught by machine gun fire from the 149th Bde. Approximately one hundred Germans who had been caught in this machine gun fire subsequently surrendered. High Wood was then cleared, step by step.

High Wood viewed from Martinpuich - 2005

News of the frontal attack on the second and third objectives was slow to come in and was principally based on disconnected statements from wounded men for quite some time.

At 11.40am 2nd Lt Wilson returned to Bn HQ and reconfirmed his previous report. Lt Westrope RFA reported that he had taken command of ‘C’ Coy because all of its officers had either been killed or wounded. Lt Westrope was himself then hit, so a Cpl led the 'C' Coy attack against the second objective, which they appear to have reached.

By 12 noon all of the 6th Bn were involved in the action, so the CO (Col Spain) moved his Bn HQ forward into Clark's Trench.

By 1pm the 47th Divn had succeeded in clearing the enemy from High Wood, but it was to late the damage had been done.

By 3.30pm shellfire had forced all of the 4th Bn back to Hook Trench. So when Col Gibson moved his HQ into it he discovered that it was in a poor state with a muddle of fusiliers from all four Bns. However, the men were quickly sorted into their Bns and communications established with the Bn of the 47th Divn on

their right flank. At this time there were also approximately one hundred men of the 7th Bn in the Sunken Road forward of Hook Trench and south of 'The Bow'29. With the exception of a handful of men that withdrew with 2nd Lt Browne (Bn HQ) around 1.30am on the 16th, when part of the 47th Divn arrived, all men of the 149th Bde forward of the Sunken Road had become casualties. This was still the situation reported to Bde HQ at dusk.

At 4pm it was reported to 50th Divn HQ that the 150th Bde had been shelled out of the Starfish Line and were holding on to Martin Alley and Martin Trench.

At 5.45pm General Wilkinson ordered the 151st Bde to launch an assault on Prue Trench between the right boundary of the Divn and Crescent Alley at 7.30pm. The 150th Bde were tasked with occupying the rest of Prue Trench and linking up with the 15th Divn in Martinpuich.

The dispositions of the 149th Bde at 6.55pm are thus given in the Bde diary;

“Scout officers have been in touch with a body of men, strength unknown, holding part of Starfish in M.34.a (second objective on right of Divn front). About one hundred men consolidated strong point M.33.D.26 (this was the sunken road between the first and second objectives, occupied by the 7th Bn).” (50th Divn)

About 7.30pm. The 151st Bde passed through Hook Trench to attack and consolidate the Starfish Line and Prue Trench, where the situation had been unclear all day, but the attack failed.

About 9.40pm the 5th Bn Border Regt, 6th Bn DLI and 9th Bn DLI assaulted Prue Trench east of Crescent Alley following a special bombardment.

Saturday, 16th Sep 1916

At 4.45am a message was received from 149th Bde HQ stating that 151st Bde were making every effort to occupy and consolidate the Starfish Line.

At 6.45am the 4th Bn received a further message stating that, after a fifteen minute long bombardment, the 151st Bde would launch an attack at

9.25am to seize and occupy Prue Trench, east of Crescent Alley. Some parties from the 5th Bn Border Regt and 9th Bn DLI reached the objective, but they were forced back and the attack failed. Not even the Starfish Line was secured. During this time the 4th Bn maintained its position in Hook Trench alongside its HQ under constant bombardment from 5.9’shells.

“West of Crescent Alley, 150th Bde sent the 5th Bn DLI to attack Prue Trench but they were unsuccessful, having swerved to far to the left. Later in the day, attempts were made to bomb along Prue Trench from Martin Alley, but little ground was gained.” (McCarthy, p.110).

From subsequent information it runs clear that the 4th Bn took part of the second objective, and advanced to the third objective (Prue Trench) on the morning of the 15th. Both these trenches were evacuated by the enemy during the attack, and only held afterwards at each end of our front by Machine guns and bombers. In the afternoon 149th Inf Bde was allocated to Divn reserve and the Bn left Hook Trench for Mametz Wood30.

By 2pm the 50th Divn front line ran from the eastern end of Hook Trench - The Bow; part of Crescent Alley; Martin Trench; Prue Trench and Starfish Line and the west of Crescent Alley and Martin Alley.

Casualties

The 4th Bn sent twenty-two officers and six hundred and ninety-five men into action that morning. The subsequent roll call revealed that 10 officers and 110 men had been killed, 7 officers and 229 men wounded and 143 were missing.

Records show that at least 180 fusiliers from the 4th Bn were actually killed in action or died of wounds during the Battle of Flers-Courcelette. For information on 4th Bn burial and memorial sites for casualties sustained in this battle, select the link.

In 1934 the body of a British soldier was uncovered near High Wood. It was in the process of carefully removing the body for burial at the nearby London Cemetery Extension that Imperial War Graves Commission staff uncovered the dog tags of Sgt  Surtees Forster.

Sgt S. Forster
Sgt Surtees Forster (Image courtesy: Mrs M Fairless)
Sgt S Forster's dog tags
Sgt S Forster's dog tags (Image courtesy Mrs M. Fairless)

Bibliography

[zotpress items="WPX27IS4" style="harvard1"]

[zotpress items="HUXKQ9EA" style="harvard1"]

[zotpress items="4R6FADJ9" style="harvard1"]

[zotpress items="5MC7CZF6" style="harvard1"]

[zotpress items="E5S9ZH42" style="harvard1"]

[zotpress items="ZZCPTDHK" style="harvard1"]

[zotpress items="XGEW4MF2" style="harvard1"]

Flers/Courcelette - Military Units

15th (Scottish) Division - Comprised of the 44th, 45th and 46th Infantry Brigades.

44th Bde - Comprised of the 9th Bn - Black Watch, 8th Bn - Seaforth Highlanders, 8th & 10th Bns - Gordon Highlanders, 7th Bn - Camerons.

45th Bde -Comprised of the 13th Bn - Royal Scots, 6th & 7th Bn - Royal Scots Fusiliers, 6th Bn - Camerons, 11th Bn - Argyll and Sutherland Highlanders.

46th Bde - Comprised of the 10th Bn - Scottish Rifles, 7th & 8th Bn Kings Own Scottish Borderers, 10th & 11th Bn - Highland Light Infantry, 12th Bn - Highland Light Infantry.

47th (1/2nd London) Territorial Division - Comprised of the 140th, 141st and 142nd Infantry Brigades.

140th Bde - Comprised of the 1/6th Bn - The London Regt (Finsbury), 1/7th Bn - The London Regt (Shoreditch), 1/8th Bn - The London Regt (Post Office Rifles) and 1/15th Bn - The London Regt (Civil Service Rifles).

141st Bde - Comprised of the 1/17th Bn - The London Regt (Popular & Stepney Rifles), 1/18th Bn - The London Regt (London Irish Rifles), 1/19th Bn - The London Regt (St Pancras) and 1/20th Bn - The London Regt (Blackheath & Woolwich).

142nd Bde - Comprised of the 1/21st Bn - The London Regt (1st Surrey Rifles), 1/22nd Bn - The London Regt (The Queens - Bermondsey), 1/23rd Bn - The London Regt (Battersea) & 1/24th Bn - The London Regt (The Queens - Southwark).

50th (Northumbrian) Territorial Division - Comprised of the 149th, 150th and 151st Infantry Brigades.

149th (Northumbrian) Bde - Comprised of 1/4th, 1/5th, 1/6th and 1/7th Bns - Northumberland Fusiliers.

150th (York & Durham) Bde - Comprised of 1/4th Bn East Yorkshire Regt, 1/4th & 1/5th Bn - Green Howards and 1/5th Bn Durham Light Infantry

151st (Durham Light Infantry) Bde - Comprised of 1/5th Bn - Border Regt, 1/6th, 1/8th and 1/9th Bns - DLI


Armagh Wood

19th Mar 1916

The Bn moved into the support lines at at H.30.a, Blaue Pourt Farm1 and Armagh Wood2. Except one NCO wounded and Sgt Maj Sharp killed (see burial book) these were three quiet days. On the night of 21st and 22nd the Bn was relieved by the 4th Bn East Yorkshires and moved back to Dickebusch Huts3. This was a difficult relief due to traffic congestion.

Usual refitting, reclothing and Coy parades. On the 23rd Gen Sir Douglas Haig came and inspected the Bn; it was a wet day and he only saw the men in their huts. A concert was held the same night in the YMCA hut, which went off successfully. The 50th Divn relieved the 3rd Divn in a sector running from the Ypres-Comines Canal at 'The Bluff'4 to Trench '34', the 50th Divn front being held once more by two Bdes and extending from the Bluff to Trench 'A.3'.

25th - 27th Mar 1916

On the night of 24th, the Bn went up to the trenches at Mount Sorrel5 , between Hill 606 and Sanctuary Wood7 . The next two days were quiet, however, on the 26th Canadian officers, from the Bn due to relieve the 4th Bn, visited the trenches. On the 27th the Bn was relieved by the 5th Bn and proceeded to close support positions, with the Bn HQ at Square Wood8.

Sanctuary, Square & Armagh Wood - Military Units

17th Division - Comprised of the 50th, 51st and 52nd Bdes

The 50th Bde. Comprised of the 10th Bn - West Yorkshire Regt, 7th Bn - East Yorkshire Regt, 7th Bn - Yorkshire Regt, 6th Bn - Dorsetshire Regt.

The 51st Bde. Comprised of the 7th Bn - Lincolnshire Regt, 7th Bn - Border Regt, 8th Bn - South Staffordshire Regt, 10th Bn - Sherwood Foresters.

The 52nd Bde. Comprised of the 9th Bn - Northumberland Fusiliers, 10th Bn - Lancashire Fusiliers, 9th Bn - Duke of Wellington’s Regt, 12th Bn - Manchester Regt

24th Division - Comprised of the 17th, 72nd and 73rd Infantry Bdes

The 17th Bde. Comprised of the 8th Bn - Buffs, 1st Bn - Royal Fusiliers, 12th Bn - Royal Fusiliers, 3rd Bn - Rifle Brigade.

The 72nd Bde. Comprised of the 8th Bn - Queen’s, 9th Bn - East Surrey Regt, 8th Bn - Queen’s Own and 1st Bn - North Staffordshire Regt.

The 73rd Bde. Comprised of the 9th Bn - Royal Sussex Regt, 7th Bn - Northamptonshire Regt, 13th Bn - Middlesex Regt, 2nd Bn - Leinster Regt.

50th (Northumbrian) Territorial Division - Comprised of the 149th, 150th and 151st Infantry Brigades.

The 149th (Northumbrian) Bde - Comprised of 1/4th, 1/5th, 1/6th and 1/7th Bns - Northumberland Fusiliers.

The 150th (York & Durham) Bde - Comprised of 1/4th Bn - East Yorkshire Regt - , 1/4th & 1/5th Bn - Green Howards and 1/5th Bn - Durham Light Infantry.

The 151st (Durham Light Infantry) Bde - Comprised of 1/5th (Cumberland) Bn - Border Regt, 1/6th, 1/8th and 1/9th Bn - DLI.

(Select link to find out more about this Brigade).

1st Canadian Division - Comprised of the 1st, 2nd and 3rd Canadian Bdes.

The 1st Canadian Bde. Comprised of the 1st, 2nd, 3rd and 4th Bns Canadian Infantry.

The 2nd Canadian Bde. Comprised of the 5th, 7th, 8th and 10th Canadian Infantry.

The 3rd Canadian Bde. Comprised of the 13th, 14th, 15th and 16th Bns Canadian Infantry. return

If would like to read the full story of the 4th NF in World War 1, then please select here 


.

Battle of Bellewarde

Summary of events

Monday, 24th May 1915

It was on this day that the battle now known as Bellewarde Wood began. Around 2am the Germans opened with a gas attack between Hooge1 and Turco Farm 2backed up by a very heavy artillery bombardment. The wind was favourable for such an gas attack, so many officers in the front line were on the alert and the Germans lost the element of surprise. Nevertheless, the troops had little time in which to fit and adjust their primitive respirators before the gas cloud enveloped them. The German infantry assault immediately followed the gas, but in only one part of the line near Mouse Trap Farm3 did they succeed in overrunning the British position.

At the time of the attack the 4th Bn was occupying dugouts near the Chateau des Trois Tours, Brielen4. The CO (Col Foster) of the 4th Bn, awakened by the noise, was already dressing when an orderly arrived with orders for the Bn to be ready to move at a moments notice. This was quickly followed by another orderly and another message which requested Col Foster to report to General Hull (OC 10th Bde) at No2 pontoon bridge5. Col Foster, accompanied by his Adjutant (Capt Cruddas), set off across the fields in the direction of the bridge having left orders for Major Gibson to follow on with the battalion immediately.

'We moved off about 5am, there having been no time for breakfast and most of us had to go with our water bottles empty, as the water carts were not up, and the water at the farm near at hand had been condemned' [zotpressInText item="{6C9UZ7VX}"].

As the Colonel and Capt Cruddas walked north east towards the canal the smell and effects of poison gas grew stronger. By the time they reached 10th Bde HQs6 near the canal, the gas was quite dense even though they were nearly three miles from where the Germans had released it.

General Hull gave instructions for the 4th Bn to be held in reserve on the canal bank and await further orders. It was not long before the Bn came into sight marching along the road from Brielen. The Seaforths, who had been occupying dugouts on the canal bank, moved forward to make space for them and left a very welcome supply of food and water behind. The density of gas in the canal cutting by this time was quite bad, so Col Foster ordered his men to lie just below the top of the bank. They were more exposed to exploding shells, but the CO considered it the lesser of two evils. The heavy shelling continued until approximately 7.30am.

At 10am orders were received to move to the 2nd Divn line west of the St Jean7 - Wieltje8 road. To try and minimise casualties the Bn crossed the fields in single file and entered a deep ditch on one side of the road. Although they all wore their respirators the gas was affecting many in the Bn.

This line was full of troops so the Bn advanced again to the support line at View Farm9. , 'A' & 'D' Coys, under a shower of shells, then recrossed the road and advanced to some trenches near Hill Top Farm10. Capt Robinson, already half blinded by the gas, stumbled into a shell hole and sprained his ankle. Lt Bunbury assumed command of 'A' Coy, but it was not long before he was hit in the foot by a machine gun bullet and had to hand command of the Coy to Lt Turner.

Gas shells were falling around the fusiliers, so at some stage during the afternoon half of 'B' and 'C' Coys were moved out of their trenches and west along the road. Orders were then received to send a Coy to Mouse Trap Farm, a short distance to the north east of the Bn position, to assist the Dublins. The OC of the 1st Bn Warwickshire Regt stopped 'C' Coy stating that the Germans had already driven the Dublins out and captured the farm. 'C' Coy returned during the afternoon with remnants of the 7th Bn and East Lancashires.

At 6pm Col Foster received a service instruction sheet from the OC Warwickshires:

"As soon as it is dusk, please send two Companies into the support lines to prolong the line now held by the Seaforth Highlanders. Also please be in command of the line for the present during my absence, at the telephone in a house which will be shown you on arrival here".

The Bn was then ordered to support a counter-attack by the Somersets and Monmouths set for 10pm. However, this was countermanded because the Germans captured an orderly carrying a message to the Dublin Fusiliers referring to the attack. By this time gas shells were falling heavy and one burst in the trench, killing one man and wounding another. Although the gas was painful to the eyes, no further harm was done. Half of 'B' and 'C' Coys were moved west along the road to avoid the shelling.

In compliance with the Service Instruction issued earlier, B' Company moved forward at dusk to the first line trench to the east of the St Jean-Wieltje road and 200 yards south of Wieltje village, 'A' & half of 'C' Company occupied a trench on the left flank between the road and the Seaforths position . Half of 'D' Coy were placed in support behind them, west of road. The other half of 'C' Coy were placed behind them (map 2). The other half of 'D Coy had been missing since the morning.

At 11.30pm an Orderly arrived with instructions for all available men to be redeployed to the right of the roadway, and for Col Foster to report to General Hull in the village of St Jean. It was a bright moonlit night and the German machine guns were very active, so Col Foster had a lively walk back, guided by the Orderly. Col Poole of the Warwicks was there when he arrived. Col Foster was instructed to dig in to the right of the road and as far east as a small clump of trees. He was also instructed "to stick it at all costs".

Tuesday, 25th May 1915

Col Foster returned to the Bn positions in the support trench to discover that only 'B' Coy were still there. Lts Bradley and Cranage were dispatched to try and locate the missing half of 'D' Coy. Bradley returned to report that they had been commandeered by another Brigadier, attached to the East Lancashires11 and were now filling a gap at Turco Farm. Lt Cranage failed to return because he had been severely wounded shortly after setting off, but fortunately he was spotted by the Bn stretcher bearers and taken to a casualty clearing station.

Trench digging commenced, but with so few men available little progress was made before daybreak when exposed work of this nature had to stop anyway.

The remaining half of 'C' reached 'A' Coy at 2am.

The half of 'D' Coy manning the support trench to the west of the road were hit by half a dozen artillery shells at 2am, some containing gas. A cloud of gas rolled down into the trench but no one was harmed. By 6am this half of 'D' Company were in the support trench east of road. Barricade of support trench on road and house in rear crumped. 'B' & 'C' Companies dug in all night and all day. Shrapnel hit some men from 'B' Company.

The day broke in brilliant sunshine. The fusiliers were awakened by a tremendous boom to the west of Ypres, followed by a sound like an express train drawing near and then passing overhead. Those who peered over the parapet witnessed a 'Grannie' shell score a direct hit on the German occupied Shell Trap Farm.

Flames, red dust and dark masses of debris flung themselves into the sky, followed by volumes of dense black smoke.

About six smaller shells of 9.2 or 6 inch calibre subsequently fell in the same area.

The men were greatly cheered by this episode, feeling a little compensated for the vile gassing of yesterday and the loss of their trench. But the Monmouths celebrated the event a trifle too enthusiastically by lighting fires in front of their dug-outs, against their officers’ orders, of course, and the smoke attracted the enemy’s fire at once (Col A.J Foster).

British artillery shelled the trenches Bellewarde Farm12 all afternoon.

Throughout the 24th of May the 4th Bn, along with several other Bns, were moved in response to orders and counter-orders to try and stem the advance of German troops. Although not directly involved in front line fighting, the constant shelling and exposure to gas resulted in 6 men killed, 27 wounded and 1 missing.

Letter from Pte J Moody (‘A’ Coy) published in the Hexham Courant - 17th of June 1915.

On Sunday night a terrific bombardment started, and early on Monday morning we got the order to leave our dugouts and advance. The Germans were using those gases so we had to use our respirators. I do not know how we could have come on without them, and we passed a lot of unfortunate soldiers making their way back, some of them badly gassed. The effects of the gas are to awful for words. The sweat was teeming down the men’s faces and they were gasping and choking for breath. Thanks to my respirator I was able to go on although I thought my head was going to split. Once, as we advanced towards some trenches a German machine gun started to play on us and Lt Bunbury, one of our officers was wounded. Whenever we crossed a field it was ploughed up by ‘Jack Johnsons’13

They were bursting all over, and how we got so far up with so few casualties is little short of a miracle. When night fell we went forward again and took our place in the firing line. Things were pretty quiet just then, only a few stray bullets flying about, but we had to keep a sharp lookout as the German trenches were only some 500 yards in front of us. We were only in the front line two days and are now back in some reserve trenches not far behind the front line. I expect we will be going further back for a rest shortly and will give you further news then'.

Casualties

Records show that at least 6 fusiliers from the 4th Bn were killed in action or died of wounds during the Battle of Bellewarde. For information on 4th Bn burial and memorial sites for casualties sustained in this battle, select the link.

Bibliography

[zotpress items="WPX27IS4" style="harvard1"]

[zotpress items="HUXKQ9EA" style="harvard1"]

[zotpress items="4R6FADJ9" style="harvard1"]

[zotpress items="6C9UZ7VX" style="harvard1"]

[zotpress items="5MC7CZF6" style="harvard1"]

[zotpress items="APPZ39F9" style="harvard1"]

[zotpress items="BSS9NIJC" style="harvard1"]

If would like to read the full story of the 4th NF in World War 1, then please select here

.

.