
Saturday, 9th Sep 1916
At 3pm, the 4th Bn moved from Henencourt Wood, via Millencourt7 and Albert8, to Becourt Wood9, situated approximately two miles east of Albert. The 50th Division (Divn) were moving into the front line, between the village of Martinpuich10 and High Wood11, in preparation for an attack. The 149th Bde were assigned the right flank of the sector and the 150th Bde the left. That evening the 5th Bn moved into the front line and the 6th Bn into the support lines.
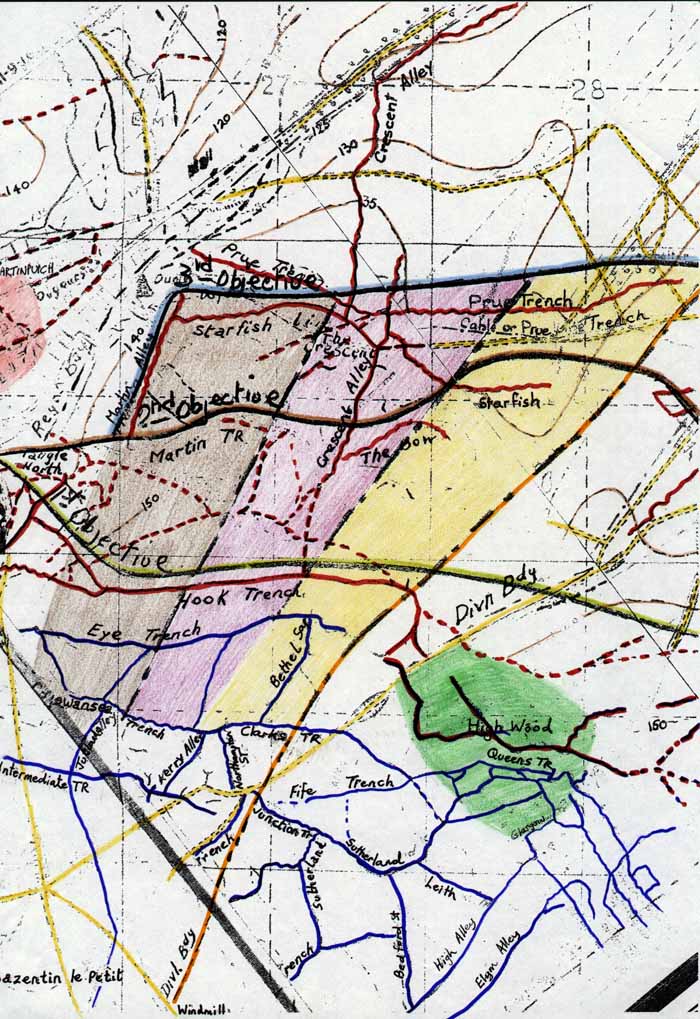
4th Battalion War Diary
The author has coloured this map for clarity
Lines British trenches - dark blue, German trenches - red, pre-war road & tracks - yellow, contours - brown.
Shading 4th Bn line of attack - yellow, 7th Bn - purple, 150th Bde - brown
High Wood - green, Martinpuich - red
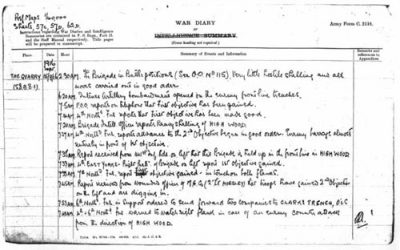
Page from 149th Bde War Diary
15 Sep 1916
Friday, 15th Sep 1916
By 2.30am, the entire 50th Divn was assembled in its' battle positions. The 150th Bde were on the left flank of the 50th Divn sector with the 15th (Scottish) Divn to its immediate left, the 149th Bde were on the right flank with the 47th (London) Divn to their right, immediately south of High Wood. The 151st Bde was held in reserve.
The 7th Bn assembled on the left flank of the 149th Bde sector and sited its' headquarters (HQ) in Clark's Trench (map ref: S.3a 1,0). The 4th Bn moved into the two lines of assembly trenches on the right flank, connecting Bethel Sap20 and Jutland Avenue, to the north of Clark's Trench (principally Eye Trench) (map ref: S.3b 6.6 - S.3b O5.5.). Running from left to right the 4th Bn Coys were ordered D, B, A and C. Bn HQ was sited in Clark's Trench (map ref: S.3c.4.9). The 6th Bn manned the support line with its' HQ at 'New Quarry' (map ref: S8d 9.9.5). The 5th Bn was held in reserve with HQ at the 'Old Quarry' (map ref: S.8b.8.1). 149th Bde HQ was located in 'The Quarry' at (map ref: S.8b.8.1).
The 50th Divn were given three objectives for the attack planned to commence at 6.20am. The first was Hook Trench21, which ran westward from High Wood along the top of a ridge to a point south east of Martinpuich. On the reverse slope of the ridge at about 500 yards distance was the second objective; Martin Trench22, The Bow23 and a portion of the Starfish Line24. The third objective was Prue Trench25 and the left end of the Starfish Line. These three objectives were known as the Brown, Green and Blue Lines respectively. A communication trench known as Crescent Alley26 linked the enemy first and second lines with their third line and the village of Eaucourt L’Abbaye27. The 50th Divn would attack from a line approximately eleven hundred yards wide, widening to eighteen hundred yards at the final objective.
The 4th Bn were faced with an unenviable task. Earlier fighting had left a 'dog-leg' in the front line, therefore the 4th Bns' assembly (Eye) trench was three hundred yards further forward than those of the 47th Divn on the right flank. If the fusiliers did not delay their advance until the 47th Divn were alongside they would be totally exposed to enfilade fire from enemy machine guns sited in the strongpoint on the ridge top at the north west corner of High Wood (Bois De Foureaux). From this strongpoint it was possible for the enemy to rake the ground between the wood and Martinpuich to the west. The strongpoint had been repeatedly attacked in the weeks preceding, but with no success. However, if High Wood was outflanked by the 4th Bn, there was the possibility of capturing trenches eight hundred yards to the rear of the wood and cutting off the enemy units in it. The decision was taken for the 4th Bn to advance at zero hour.
The assault on the first objective, assisted by tanks for the first time in history, commenced on time. Two of the tanks supported the 150th Bde on the left flank and three supported the 47th Divn on the right. Around 7am, 4th Bn HQ recorded its first situation report from the attacking troops. It was sent by OC 'B' Coy (Capt L.D.Plummer) and stated that; Hook Trench had fallen with little opposition, contact had been established on the left flank with ‘D’ Coy (OC - Capt H.H. Bell) and the 7th Bn and that the 7th Bn were in contact with the 4th Bn East Yorks (150th Bde). Shortly after this message another was received stating that wounded men from ‘B’ Coy were returning to the start point.
4th Bn HQ telephoned Bde HQ at 7.14am to report that the first objective had been 'made good'. However, the 4th and 7th Bns had just begun to dig in at the first objective when they came under heavy machine gun and rifle fire from the direction of High Wood. The fusiliers took shelter until it was time to advance on the second objective at 7.20am.
The time arrived and the 149th and 150th Bdes climbed out of Hook Trench and advanced behind a creeping artillery barrage moving forward at fifty yards per minute. At the same time a Coy from the 6th Bn, (OC - Capt Tweedy), moved forward to occupy and consolidate Hook Trench.
At 7.27am Bde HQ received a report from the 4th Bn stating that the advance to the 2nd objective had begun in good order and that the enemy barrage was falling almost entirely in front of the 1st objective. This was followed at 7.35am by a report from the 141st Bde stating that they were 'held up' in the front line in High Wood.
The second objective was captured and fusiliers of the 4th Bn entered the Starfish Line, but enemy fire from both flanks inflicted very heavy casualties on them. With the 47th Divn held up in High Wood and unable to provide any support on the right flank, the 4th Bn were forced to fall back to Hook Trench. The severe difficulties experienced by the 47th Divn, in High Wood, meant that the right flank of the 4th Bn was now dangerously exposed and would had to be carefully guarded from attack. Hook Trench and Bethel Sap were strengthened and made secure.
At 7.45am 4th Bn HQ received a message from Bde HQ stating that the 47th Divn attack on High Wood had ground to a halt and that the 5th and 6th Bns were now advancing in order to reinforce the attack.
Col Gibson had no men to spare in Clark's Trench, so at 8.05am he wired for another Coy to be sent forward to Clark's Trench with the intention of forming a defensive flank in Bethel Sap, and sent 2nd Lt Wilson (Bn HQ) to assess the situation to the right of Hook Trench. His report stated that the north end of Bethel Sap and right end of Hook Trench was being swept by machine gun fire from High Wood.
At 8.20am 4th Bn HQ received a further message from Bde HQ, which stated that the London Irish were unable to advance in High Wood, so they were now trying to work round it. The 4th Bn was ordered to assist them by directing Stokes Mortar and Lewis Gun fire from Bethel Sap onto the north western edge of the wood (map ref: S3B 8.6), but not to fire into it.
At 8.25am two Coys from the 5th Bn were sent forward to Brecon Trench28 and Intermediate Trench and shortly afterwards a Coy from the 6th Bn (OC - Capt Demford) were placed at the disposal of Col Gibson by OC 7th Bn. Half of this Coy was sent to Bethel Sap and half to the left end of Hook Trench with orders to work along half right and form a defensive flank. At 8.50am 2nd Lt Wilson's findings were reported to Bde HQ by Col Gibson. However, by 9am further reports were sent stating that Stokes, Vickers and Lewis guns were protecting Bethel Sap and that Hook Trench was held for a few yards east of its junction with Bethel Sap. At 9.05am the 9th DLI were sent forward to assist the 149th Bde.
At 9.15am a wounded NCO from the 4th Bn reported that the 2nd objective had been reached on the right flank, however, they had been forced to retire due to the machine gun fire coming from the right flank.
At 9.25am the 4th Bn reported that the enemy had launched a bombing attack on Bethel Sap from the direction of High Wood, this was quickly followed by a request for bombers to be sent forward to assist with the defence. At 9.39am a Coy from the 6th Bn, who by now were in Clark's Trench, were placed at the disposal of OC 4th Bn and a Coy from the 5th Bn moved forward to take its place.
The 4th Bn received a message at 9.45am, stating that Divn HQ had directed that Hook Trench must be made good and strengthened as far right as the Divn boundary. Hook Trench and Bethel Sap were strengthened and the right flank was secured as far as it was possible, with Lewis Gun and Stokes Mortar fire employed to disperse the continued attacks by enemy bombing parties from High Wood.
At 10am the 5th Bn were ordered to move three Coys forward to Brecon Trench and to be prepared to support 4th Bn should an enemy counterattack from High Wood materialise. Parts of the third objective (Starfish Line) fell to the 150th Bde around this time, but the 4th Bn East Yorks were forced to fall back to Martin Trench because they were so exposed on the right flank. Elements of the 7th Bn had managed to reach 'The Bow' and the sunken road immediately south of it by 10.12am, but the 4th Bn had been cut to pieces by the fire from High Wood
While fighting continued on the right flank to the north-west of High Wood, where the 6th Bn were now providing a defensive flank.
10.10am 4th Bn reported having sent half Coy to Bethel Sap and half Coy to left flank of the 1st objective to bomb down Hook Trench. Enemy still bombing down the right flank of Hook Trench.
10.12am the 7th Bn reported that the Sunken road and Bow Trench, just short of the 2nd objective, had been reached.
“By 10.30am so little progress had been made that Pulteney curtailed the corps' effort for the day and ordered the 50th and 47th Divns to aim only for the second of their three objectives.” (Farrar-Hockley).
At 10.35am a Coy from the 5th Bn (OC - Lt Daglish), arrived in Clark's Trench to garrison it. At 10.40am 2nd Lt Wilson was sent forward once more to assess the situation around Hook Trench. Half of Lt Daglish’s Coy was sent forward to bomb round Hook Trench on the right and make contact with Bethel Sap.
At 11.30am heavy artillery bombarded the north west corner of High Wood at the request of the OC 141st Bde. As the 47th Divn gradually worked round High Wood the enemy began to retire and were again caught by machine gun fire from the 149th Bde. Approximately one hundred Germans who had been caught in this machine gun fire subsequently surrendered. High Wood was then cleared, step by step.
News of the frontal attack on the second and third objectives was slow to come in and was principally based on disconnected statements from wounded men for quite some time.
At 11.40am 2nd Lt Wilson returned to Bn HQ and reconfirmed his previous report. Lt Westrope RFA reported that he had taken command of ‘C’ Coy because all of its officers had either been killed or wounded. Lt Westrope was himself then hit, so a Cpl led the 'C' Coy attack against the second objective, which they appear to have reached.
By 12 noon all of the 6th Bn were involved in the action, so the CO (Col Spain) moved his Bn HQ forward into Clark's Trench.
By 1pm the 47th Divn had succeeded in clearing the enemy from High Wood, but it was to late the damage had been done.
By 3.30pm shellfire had forced all of the 4th Bn back to Hook Trench. So when Col Gibson moved his HQ into it he discovered that it was in a poor state with a muddle of fusiliers from all four Bns. However, the men were quickly sorted into their Bns and communications established with the Bn of the 47th Divn on
their right flank. At this time there were also approximately one hundred men of the 7th Bn in the Sunken Road forward of Hook Trench and south of 'The Bow'29. With the exception of a handful of men that withdrew with 2nd Lt Browne (Bn HQ) around 1.30am on the 16th, when part of the 47th Divn arrived, all men of the 149th Bde forward of the Sunken Road had become casualties. This was still the situation reported to Bde HQ at dusk.
At 4pm it was reported to 50th Divn HQ that the 150th Bde had been shelled out of the Starfish Line and were holding on to Martin Alley and Martin Trench.
At 5.45pm General Wilkinson ordered the 151st Bde to launch an assault on Prue Trench between the right boundary of the Divn and Crescent Alley at 7.30pm. The 150th Bde were tasked with occupying the rest of Prue Trench and linking up with the 15th Divn in Martinpuich.
The dispositions of the 149th Bde at 6.55pm are thus given in the Bde diary;
“Scout officers have been in touch with a body of men, strength unknown, holding part of Starfish in M.34.a (second objective on right of Divn front). About one hundred men consolidated strong point M.33.D.26 (this was the sunken road between the first and second objectives, occupied by the 7th Bn).” (50th Divn)
About 7.30pm. The 151st Bde passed through Hook Trench to attack and consolidate the Starfish Line and Prue Trench, where the situation had been unclear all day, but the attack failed.
About 9.40pm the 5th Bn Border Regt, 6th Bn DLI and 9th Bn DLI assaulted Prue Trench east of Crescent Alley following a special bombardment.
Footnotes
- Meteren
- Bailleul
- Doullens
- Fienvillers
- Pierregotte
- Henencourt Wood
- Millencourt
- Albert
- Becourt Wood
- Martinpuich
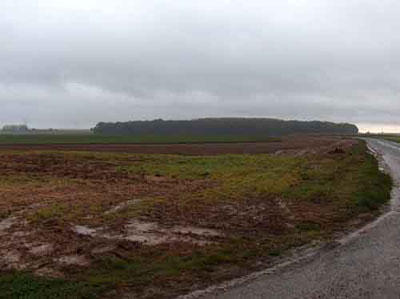
- High Wood
- Quadrangle Trench
- Clark's Trench - The front line trench from which the 4th Bn launched their assault
- Eye Trench
- 6th Avenue East
- Intermediate Trench
- Communication Trench linking intermediate, Swansea and Eye Trench.
- Mametz Wood
- Quarry
- Bethel Sap - A communication trench linking Clark's Trench with Eye Trench on the extreme right flank of the 50th Divn
- Hook Trench - The first objective for the 4th Bn assault
- Martin Trench - Part of the second objective for the 150th Bde.
- The Bow - Part of the second objective for the 4th and 7th Bns.
- Starfish Line
- Prue Trench - Part of the third objective for the 4th and 7th Bns.
- Crescent Alley - German communication trench linking all three defensive lines.
- Eaucourt L'Abbaye
- British support trench to the rear of Clark's Trench.
- The Bow
- Mametz Wood